
 OData Tutorial - Query SAP and Microsoft systems from Python
Talk to SAP S/4HANA, SuccessFactors, Dynamics 365 and Business Central from Zato with plain Python dicts.
OData is the API language of the enterprise back office - SAP S/4HANA, SuccessFactors, Dynamics 365 and Business Central all expose their data through it. This tutorial shows how to talk to any of them from Zato with plain Python dicts: no SDKs, no code generation, no per-system client libraries.
The running example is Microsoft Business Central - its API is publicly documented and its sandbox is easy to obtain. Everything shown here applies unchanged to any other OData service.
Read your first entities in under 5 minutes.
In this tutorial
- Create the outgoing connection
- Read your first entities
- Filter, select and sort the results
- Page through large sets
- Write data
- Deploy with enmasse
Remember: you can connect your AI copilot to Zato documentation.
Create the outgoing connection
Step 1. If you do not have Zato running yet, install it via Docker - it takes under 5 minutes.
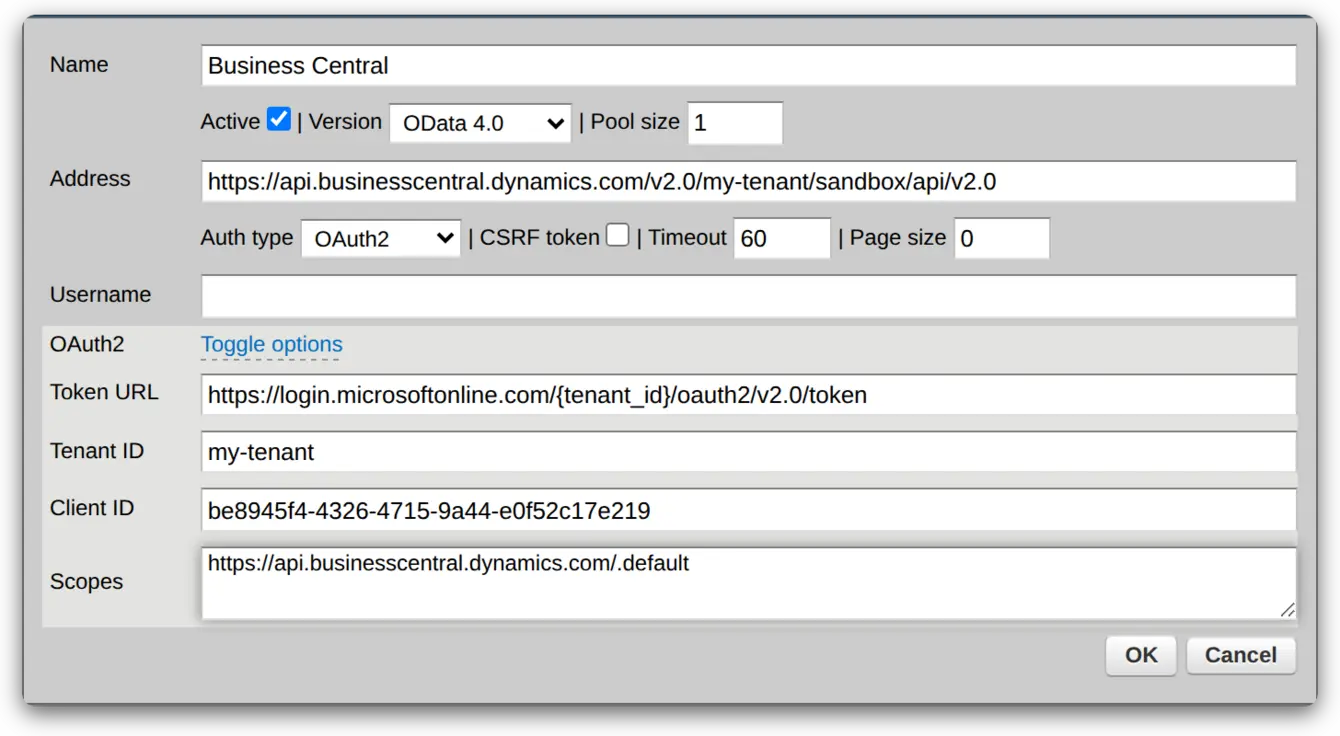
Step 2. Open the web admin dashboard at http://localhost:8183, navigate to Connections > Outgoing > OData, click Create a new outgoing OData connection and fill in the form:
- Name:
Business Central - Address:
https://api.businesscentral.dynamics.com/v2.0/<tenant>/sandbox/api/v2.0 - OData version:
4.0 - Auth type:
OAuth2 - Token URL:
https://login.microsoftonline.com/{tenant_id}/oauth2/v2.0/token - Tenant ID: your Microsoft Entra ID tenant
- Client ID: your registered application's ID
- Scopes:
https://api.businesscentral.dynamics.com/.default - Click OK
Step 3. Set the client secret - in the connection list, hover over the connection's name, choose Change password and enter the secret.
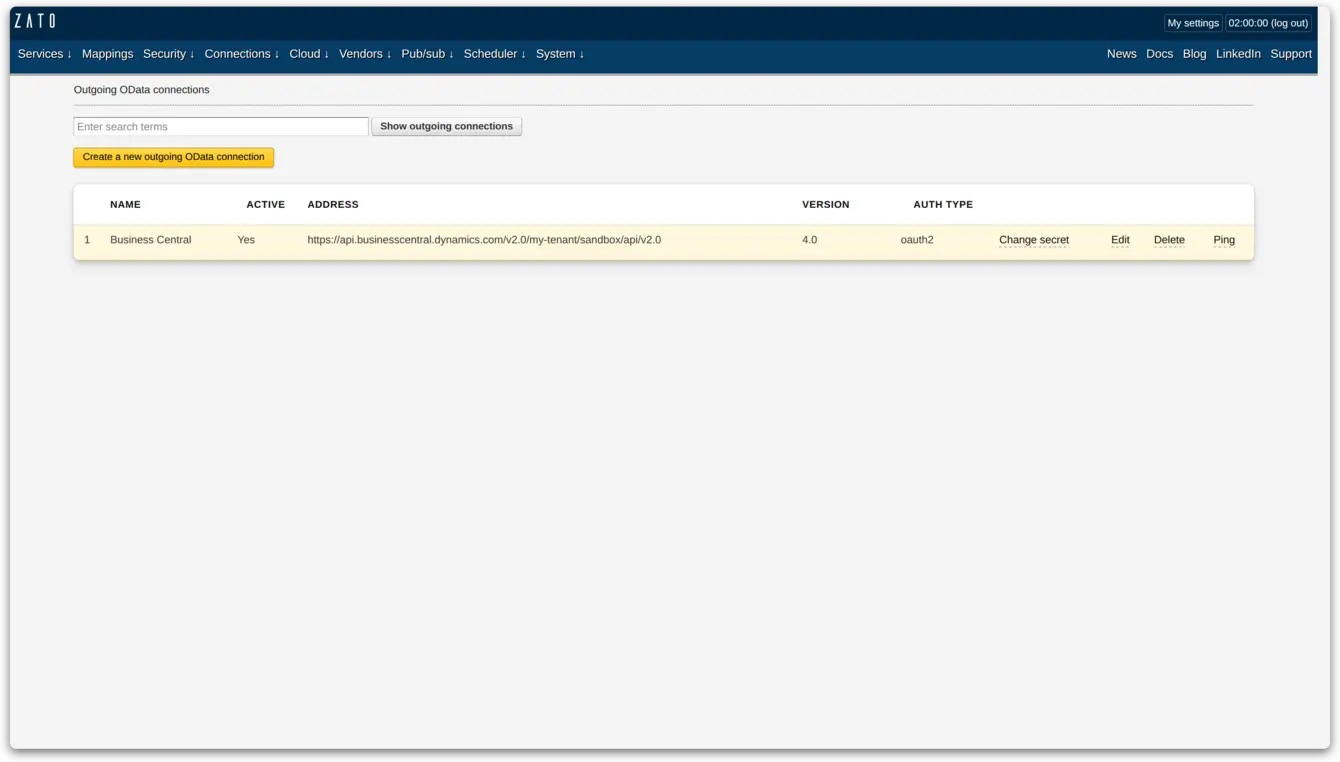
The connection appears in the list, ready to use - no server restarts are needed:
Basic as the auth type instead - a username in the form, the key set through Change password - and everything below works the same.Read your first entities
Open the Zato IDE at http://localhost:8183, create a new file called bc_api.py, paste this code, and click Deploy:
# -*- coding: utf-8 -*-

# stdlib
import json

# Zato
from zato.server.service import Service

# ################################################################################################################################
# ################################################################################################################################

class GetCompanies(Service):
    """ Returns the companies the Business Central environment contains.
    """
    name = 'bc-api.get-companies'

    def handle(self) -> 'None':

        # Obtain a client connected to Business Central
        conn = self.odata['Business Central']

        # All Business Central data is scoped to a company - list the companies first
        companies = conn.read('companies')

        # Log and return what we received
        for company in companies:
            self.logger.info('Company -> %s (%s)', company['name'], company['id'])

        self.response.payload = json.dumps({'companies': companies})

# ################################################################################################################################
# ################################################################################################################################
Invoke the service from the IDE and the companies appear in the response and in server logs:
Each entity is a regular Python dict - what the server returns is what the code receives.
Filter, select and sort the results
Query options are keyword arguments - the code below reads customers from one city only, brings back just three properties and sorts the result:
class GetCustomers(Service):
    """ Returns customers from a given city, sorted by name.
    """
    name = 'bc-api.get-customers'
    input = 'company_id', 'city'

    def handle(self) -> 'None':

        conn = self.odata['Business Central']

        customers = conn.read(f'companies({self.request.input.company_id})/customers',
            filter=f"city eq '{self.request.input.city}'",
            select='id,displayName,city',
            orderby='displayName',
        )

        self.response.payload = json.dumps({'customers': customers})
Filtering happens on the server - only the matching entities come back.
Page through large sets
Servers cap how many entities one response contains. The .iter method follows the paging links transparently, yielding entity after entity until the set is exhausted:
class CountItems(Service):
    """ Iterates over all the items, page after page.
    """
    name = 'bc-api.count-items'
    input = 'company_id'

    def handle(self) -> 'None':

        conn = self.odata['Business Central']

        total = 0
        for item in conn.iter(f'companies({self.request.input.company_id})/items'):
            total += 1

        self.logger.info('Total items -> %s', total)
When only the number matters, skip the transfer entirely:
Write data
Creating, updating and deleting entities uses the same connection and entity paths as reading them. Business Central enforces optimistic concurrency, so the update passes the entity's ETag:
class CreateCustomer(Service):
    """ Creates a customer, renames it and deletes it again.
    """
    name = 'bc-api.create-customer'
    input = 'company_id'

    def handle(self) -> 'None':

        conn = self.odata['Business Central']
        path = f'companies({self.request.input.company_id})/customers'

        # Create a new customer
        customer = conn.create(path, {'displayName': 'Alexandra Baker'})

        # Update it - only the fields given change, and the ETag detects
        # concurrent modifications
        customer = conn.update(path, customer['id'],
            {'displayName': 'Alexandra Carter'},
            etag=customer['@odata.etag'])

        # And delete it
        conn.delete(path, customer['id'], etag=customer['@odata.etag'])
Deploy with enmasse
Everything you configured through the Dashboard can also be defined declaratively in YAML and deployed with enmasse. This is the recommended approach for production, CI/CD pipelines, and version-controlled infrastructure.
The connection from this tutorial can be expressed as:
odata:
  - name: Business Central
    address: https://api.businesscentral.dynamics.com/v2.0/<tenant>/sandbox/api/v2.0
    odata_version: "4.0"
    auth_type: oauth2
    token_url: https://login.microsoftonline.com/{tenant_id}/oauth2/v2.0/token
    tenant_id: Zato_Enmasse_Env.BC_Tenant_ID
    client_id: Zato_Enmasse_Env.BC_Client_ID
    client_secret: Zato_Enmasse_Env.BC_Client_Secret
    scopes: https://api.businesscentral.dynamics.com/.default
Import it in the Dashboard under System → Config → Import enmasse, or mount the file under /opt/hot-deploy/enmasse/enmasse.yaml inside the container to have it imported on start.
The Zato_Enmasse_Env. prefix reads values from environment variables, keeping secrets out of configuration files.
Learn more
Schedule a meaningful demo
Book a demo with an expert who will help you build meaningful systems that match your ambitions
"For me, Zato Source is the only technology partner to help with operational improvements."
 - John Adams
Program Manager of Channel Enablement at Keysight 